


How to Build Concrete Sleeper Walls Brisbane
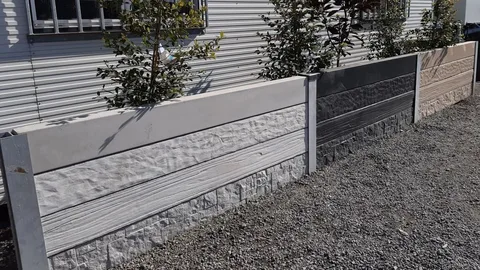
Concrete Sleeper Walls Brisbane have become increasingly popular for retaining walls in Brisbane due to their strength and visual appeal. These walls offer both durability and versatility, making them ideal for a range of landscaping projects. Made from reinforced concrete, the sleepers are designed to withstand significant pressure from retained soil, ensuring the wall's longevity. Their sleek, modern look can enhance the aesthetic of any outdoor space, seamlessly blending functionality with design. In addition, concrete sleeper walls require minimal maintenance, which is particularly advantageous in Brisbane's varying climate. This guide will provide a detailed, step-by-step approach to constructing your own concrete sleeper wall, from initial planning through to the final touches.
Planning Your Concrete Sleeper Wall
Before starting your project, assess the area where the wall will be constructed. Measure the space accurately to determine the wall's required dimensions, ensuring it will effectively retain the soil. Consulting with your local council is crucial to understanding any regulations or permits necessary for building a concrete sleeper wall in Brisbane, thereby avoiding potential legal issues.
Decide on the wall's height and length, and calculate the number of concrete sleepers and steel posts required. Ensure you have considered any additional supports such as deadmen or tiebacks if the wall will be tall.
It's also wise to plan for drainage solutions to prevent water buildup behind the wall. Inadequate drainage can compromise the wall's stability and longevity. Having a clear plan will help streamline the construction process and ensure all necessary elements are considered.
Materials and Tools Required
To build your concrete sleeper wall, gather the following materials: concrete sleepers, steel posts, gravel, concrete mix, and sealant. Each of these components plays a critical role in ensuring the stability and durability of your wall.
For tools, you'll need a shovel for excavation, a spirit level to ensure everything is level and a tape measure for accurate measurements. String lines will help mark the layout, while a post-hole digger is essential for digging holes in the posts. A drill may be required for securing sleepers, and a hammer will come in handy for any adjustments. Having all these tools and materials ready will make the construction process more efficient and straightforward.
Preparing the Site
Start by removing any vegetation, rocks, or debris from the area to ensure a clean working surface. Use a shovel to level the ground as much as possible.
Mark the layout of the wall using string lines, ensuring they are straight and accurate. These lines will guide you in excavating the trenches and positioning the posts correctly.
Next, dig the trenches according to your marked layout. The trenches should be deep and wide enough to accommodate the foundation and posts. Typically, a depth of 400mm and a width of 300mm are recommended, but these dimensions may vary depending on the height and length of your wall.
After excavation, lay a layer of gravel at the bottom of the trenches. This gravel base will help with drainage and provide a stable foundation for the wall. Make sure the gravel is evenly spread and compacted before installing the posts and sleepers.
Accurate site preparation is essential for the overall stability and durability of your concrete sleeper wall.
Building the Foundation
The foundation of your concrete sleeper wall is indeed a critical component, playing a major role in ensuring its stability and longevity. Begin by excavating trenches with dimensions tailored to your wall's specific requirements. Typically, this would be around 300mm wide and 400mm deep, but you should verify these measurements to fit your particular project. Once the trenches are dug, the next step is to establish a stable base.
Spread a layer of gravel along the bottom of the trench. This gravel layer is essential for proper drainage, as it prevents water from accumulating beneath the wall, which could otherwise compromise its stability. Be sure to use a compactor to ensure the gravel is evenly distributed and firmly packed down. This compaction step is crucial as it provides a solid and stable base for your concrete sleepers to rest upon.
Properly preparing the foundation layer sets the stage for the overall durability of your wall. A well-prepared foundation will help maintain the integrity of the structure, reducing the risk of shifting or settling over time. Additionally, ensuring good drainage and preventing water buildup protects the wall from potential damage. By taking these foundational steps seriously, you are setting up your concrete sleeper wall for long-term success.
Installing Posts and Sleepers
Position the steel posts in the trenches, ensuring they are evenly spaced and aligned with the string lines. Utilise a spirit level to confirm each post is perfectly vertical. Pour the concrete mix around the base of the posts, filling the trenches up to ground level. Allow the concrete to cure thoroughly before proceeding to the next step.
Once the posts are securely in place, you can begin installing the concrete sleepers. Start from the bottom row, placing each sleeper horizontally between the posts. Make sure each sleeper fits snugly against the previous one, using a rubber mallet if necessary to adjust their position. Continuously check alignment with a spirit level to maintain an even and straight wall.
Continue stacking the sleepers row by row, following the same process until the wall reaches the desired height. If additional stability is needed, especially for higher walls, consider integrating support structures like deadmen or tiebacks. This ensures the wall can effectively manage the lateral pressure from the retained soil.
Securing the Wall Structure
To ensure the stability of your concrete sleeper wall, additional supports such as deadmen or tiebacks might be necessary, especially for taller walls. These supports help distribute the pressure from the retained soil more evenly, enhancing the wall's integrity. Deadmen are typically placed perpendicular to the wall and anchored into the soil behind it, providing extra resistance against soil pressure.
Once the primary structure is secure, start backfilling the space behind the wall. It is crucial to compact the backfill soil in layers rather than filling it all at once. Layered compaction prevents future settling, which could otherwise destabilise the wall. Ensure the backfill material is well-draining to avoid water buildup, which can exert additional pressure on the wall.
To further reinforce the wall, consider installing a drainage system, such as weep holes or a perforated pipe, along the base. This helps manage water flow and reduces hydrostatic pressure. Finally, as you backfill, frequently check for any shifts in the sleepers and make necessary adjustments to maintain alignment and stability.
Finishing Touches of Sleeper Retaining Walls Brisbane
Applying a weather-resistant sealant to your Sleeper Retaining Walls Brisbane is an essential step to protect it from Brisbane's varying weather conditions. This sealant helps to prevent moisture penetration, which can cause cracking and deterioration over time. Make sure the wall is clean and dry before applying the sealant for maximum effectiveness.
Adding decorative elements can further enhance the visual appeal of your retaining wall. Consider installing caps on top of the sleepers for a polished look or integrating lighting to highlight the wall's structure at night. You can also landscape around the wall with plants, gravel, or mulch to create a cohesive and attractive garden design.
Integrating functional features such as weep holes or a perforated drainage pipe can aid in water management, reducing hydrostatic pressure behind the wall and ensuring its long-term stability. Finally, regularly inspect your wall for any signs of wear or damage and address any issues promptly to maintain its appearance and structural integrity.
Conclusion
Building concrete sleeper walls in Brisbane offers both practical and aesthetic benefits, making them an excellent choice for various landscaping projects. Their robustness ensures they can handle the pressures of retained soil while maintaining their structural integrity over time. The clean, contemporary look of concrete sleepers can complement any garden design, adding a modern touch to your outdoor space. Moreover, the process of constructing a concrete sleeper wall, from planning and gathering materials to the final installation, is straightforward with careful preparation. Proper site preparation and drainage are crucial for the longevity of the wall, as is the correct installation of posts and sleepers to ensure stability. Regular maintenance, such as sealing and inspection, will keep the wall in good condition, protecting it from Brisbane's weather extremes.
FAQS
1. Do I need a permit to build Concrete Sleeper Walls Brisbane?
Yes, depending on the height and location of the wall, you may need a permit. It's important to check with your local council for specific regulations.
2. What are the benefits of using concrete sleepers for retaining walls?
Concrete sleepers are durable, versatile, and require minimal maintenance. They offer a clean, modern look and can withstand harsh weather conditions.
3. How deep should the posts be set in the ground?
Generally, posts should be set at least one-third of their height into the ground for stability.
4. Can I build a concrete sleeper wall myself, or should I hire a professional?
While it is possible to build a concrete sleeper wall yourself, hiring a professional is recommended for larger or more complex projects to ensure structural integrity.
5. How do I maintain my concrete sleeper wall?
Regularly inspect for any signs of damage or shifting. Apply a sealant every few years to protect against weathering.
6. What is the lifespan of a concrete sleeper wall?
When properly constructed and maintained, a concrete sleeper wall can last several decades, providing a long-term solution for your landscaping needs.
Categorias
Leia Mais
When you're looking to boost your career in the field of SAP, choosing the right training institute can make all the difference. With so many SAP training institutes available in Mumbai, how do you know which one offers the best SAP Training Institutes in Mumbai that suits your career aspirations? As a student, you want to make sure that you invest your time and money in a program that...

has garnered significant attention as a natural and holistic alternative to conventional medicine. This approach to healing focuses on stimulating the body's natural healing processes and has been practiced worldwide for centuries. In Melbourne, a city known for its diverse and progressive health culture, homeopathy offers residents an opportunity to explore gentle and sustainable methods for...
Regarding the Suzuki Carry, one of the unsung heroes is its alternator. This small yet mighty component is crucial in keeping your vehicle running smoothly by charging the battery and powering electrical systems. However, like any mechanical part, it requires proper care and maintenance to function optimally. Understanding how your Suzuki Carry alternator works can save you from unexpected...

When it comes to respiratory care, the Polymed Nebulizer Mask stands out as a reliable and effective solution. Designed to deliver medication efficiently, it caters to the needs of both adults and children, making it an essential tool for healthcare professionals, patients, and caregivers alike. Why Choose Polymed Nebulizer Mask? Polymed Nebulizer Mask is crafted with high-quality...

Book Dehradun to Mussoorie cab online at best price. CabBazar provides car rental services for all cab types AC, Non AC, Hatchback, SUV, Sedan, Innova and Tempo Traveller. Both One way drop taxi and round trip cab available at lowest price. Price starts Rs. 9/Km.