


Diagnosing the Hyundai Elantra Thermostat Housing issues
If you’re a proud owner of a 2001 Hyundai Elantra, you know the joy that comes with cruising down the road in style. One common culprit could be the thermostat housing. While it may sound like an obscure part, this little component plays a crucial role in keeping your engine cool and functioning optimally. Ignoring issues related to the Hyundai Elantra thermostat housing can lead to bigger problems down the line. In this guide, we'll help you understand everything there is to know about diagnosing and fixing these issues.
Understanding the 2001 Hyundai Elantra Thermostat Housing
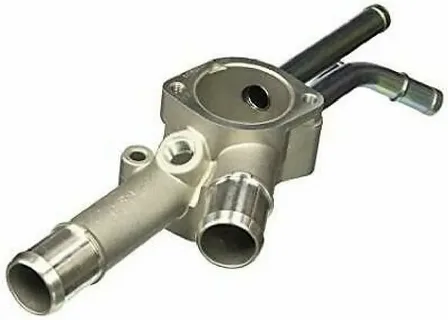
The thermostat housing in your 2001 Hyundai Elantra is a vital component of the cooling system. Think of it as the gatekeeper, regulating coolant flow between the engine and radiator. When this part works seamlessly, your car’s temperature stays balanced even during those scorching summer drives.
Made from durable plastic or aluminium, the thermostat housing houses a small but mighty mechanism—the thermostat itself. This little device expands and contracts based on temperature changes, opening up to allow coolant circulation when things get too hot under the hood.
Over time, wear and tear can take their toll. Cracks or leaks in the thermostat housing can lead to overheating issues that could leave you stranded on the side of the road. It’s essential to keep an eye out for signs like fluid puddles beneath your vehicle or fluctuating temperature gauges.
Understanding how your 2001 Hyundai Elantra Thermostat Housing functions helps you diagnose potential problems early on. A proactive approach can save both time and money down the line.
Whether you're performing routine maintenance or addressing specific concerns, knowing what makes this component tick is crucial for every Hyundai Elantra owner.
Key Features of a Thermostat Housing
The thermostat housing plays a crucial role in your Hyundai Elantra's cooling system. It serves as the connection point for the engine coolant, directing it to and from the engine block. This ensures that your engine maintains an optimal temperature during operation.
One key feature is its durable construction. Typically made from high-quality plastic or aluminium, a well-built thermostat housing can withstand extreme temperatures and pressures without warping or cracking. This durability directly impacts reliability and longevity.
Another important aspect is the integrated design of many models. Some thermostat housings come with built-in gaskets, simplifying installation while reducing potential leaks—a common headache for vehicle owners.
Additionally, they often include sensors for precise temperature monitoring. These sensors help regulate coolant flow based on real-time conditions, promoting efficient performance and helping prevent overheating problems.
Compatibility matters significantly. Many aftermarket options are designed specifically for various Hyundai Elantra years, ensuring you find a perfect fit that meets OEM specifications without compromising the quality or efficiency of your car's cooling system.
Best Aftermarket Options for a Thermostat Housing
When it comes to replacing the thermostat housing in your Hyundai Elantra, going for aftermarket options can be a game changer. These components often provide enhanced durability and performance compared to stock parts. Plus, they come with competitive pricing that won't break the bank.
One standout option is from Mishimoto. Known for their quality, Mishimoto's thermostat housings are designed to withstand higher temperatures and resist cracking under pressure. This means peace of mind during those long drives.
Another popular choice is Duralast, which offers reliable parts backed by a solid warranty. Their thermostat housing fits seamlessly into the 2001-2006 models and ensures optimal coolant flow for better engine efficiency.
For budget-conscious owners, Spectra Premium provides an excellent balance between affordability and reliability. Their products undergo rigorous testing and offer good thermal performance at a fraction of the cost of OEM parts.
Remember to check customer reviews before making a purchase. Real-world experiences can guide you toward the best product suited for your specific needs while keeping your Hyundai Elantra running smoothly.
Testing the Thermostat Housing
Testing the thermostat housing of your Hyundai Elantra is an essential step to ensure your vehicle runs smoothly. A faulty thermostat can lead to overheating and engine damage, so it’s crucial to catch issues early.
Start by checking for visible signs of wear or leaks around the housing. Any coolant traces could indicate a problem that needs addressing. If you notice residue or pooling fluid, it’s time for further testing.
Next, monitor your engine's temperature gauge during operation. An erratic reading might suggest irregularities within the thermostat housing itself. Pay close attention during both cold starts and while driving; any abnormal fluctuations should raise a red flag.
You can also perform a pressure test using specialised equipment. This method helps identify leaks that aren’t visible to the naked eye and ensures that seals are functioning correctly under normal operating conditions.
Consider checking the flow of coolant through the system when the engine reaches its operating temperature. Proper circulation is vital for maintaining optimal performance; if there are bottlenecks, your thermostat housing may be at fault.
Installation Tips for the 2002 Hyundai Elantra Thermostat Housing
Installing the 2002 Hyundai Elantra Thermostat Housing can seem daunting, but with a few simple tips, you can tackle this project like a pro. First, gather all necessary tools and parts before diving in. A clean workspace will make your task much easier.
Begin by draining the coolant from the radiator to avoid any messy spills. This step is crucial as it prevents you from getting drenched when removing the old housing. Make sure to have a suitable container for collecting fluid.
Next, carefully remove any components blocking access to the thermostat housing. Pay attention to connectors and hoses; gentle handling ensures they remain intact for future use.
When installing the new thermostat housing, apply fresh gasket sealant around its edges. This extra precaution prevents leaks that could lead to overheating issues down the road.
Once everything is back in place, refill your cooling system and run your engine briefly while checking for leaks around the newly installed part. If all goes well without drips or drops, you'll know you've done it right!
Maintenance Process of the Thermostat Housing
Maintaining the thermostat housing of your Hyundai Elantra is essential for optimal engine performance. Start by regularly inspecting the housing for signs of wear or leakage. A cracked or damaged unit can lead to overheating, which you want to avoid.
Next, keep an eye on the coolant levels in your reservoir. If you notice a drop, it might be time to check if there's a leak at the thermostat housing. Always top off with fresh coolant when necessary; this helps maintain that crucial temperature balance.
Cleaning is equally important. Use a soft cloth and some degreaser around the thermostat housing area to remove any dirt or grime buildup. This simple step can prevent corrosion and prolong its lifespan.
When it's time for replacements, opt for high-quality aftermarket parts that fit seamlessly into your Elantra's design. Cheap alternatives may save money initially but could cost more in repairs down the line.
Consult your owner's manual for scheduled maintenance intervals regarding cooling system checks and flushes. Staying proactive will ensure smooth rides and peace of mind for every mile you cover.
How to Test a Thermostat Housing After Installation?
After installing your Hyundai thermostat housing, it’s time to ensure everything is working seamlessly. Start by checking for leaks around the newly fitted housing. A simple visual inspection can save you from potential overheating issues down the line.
Next, warm up your engine and keep an eye on your temperature gauge. It should gradually rise within a normal range as coolant circulates properly through the system. If it exceeds safe levels unexpectedly, that could indicate a problem with the installation or even a faulty part.
Revving up your engine slightly while monitoring can also help detect any abnormal sounds or vibrations. Pay attention; if unusual noises are coming from under the hood, something might be amiss.
Utilise an infrared thermometer to check different areas around the thermostat housing when warmed up. This will give you precise readings of temperatures in specific spots and help you confirm that heat distribution is uniform across components.
Consider taking your car for a short drive after testing at idle speeds. Assess how well it responds during various driving conditions—this practical test can reveal hidden issues not visible initially.
Conclusion
When dealing with your Hyundai Elantra thermostat housing, knowledge is power. Understanding its features and functions can save you both time and money. The right aftermarket options ensure that you keep your vehicle running smoothly. Whether you choose OEM parts or reliable third-party brands, make sure they fit the specifications of your model. Testing the thermostat housing is crucial for performance. If you're experiencing overheating issues or coolant leaks, don’t hesitate to conduct simple checks at home before visiting a mechanic. Proper installation cannot be overlooked.
FAQS
What is the Hyundai Elantra thermostat housing?
The Hyundai Elantra thermostat housing is a critical component in your vehicle's cooling system. It houses the thermostat and connects it to the engine block and radiator. This part helps regulate engine temperature by controlling coolant flow.
How do I know if my thermostat housing is failing?
Warning signs include overheating, coolant leaks, or fluctuating temperature readings on your dashboard. If you notice any of these symptoms, it’s essential to inspect or replace the thermostat housing promptly.
Can I drive with a faulty thermostat housing?
Driving with a faulty unit can lead to serious engine damage due to overheating. It's best to address any issues as soon as they arise.
Are aftermarket parts reliable for replacement?
Many reputable brands offer high-quality aftermarket options that perform well compared to OEM parts. Always read reviews and ensure compatibility before purchasing.
How often should I check my thermostat housing?
Regular maintenance checks are key. Inspecting your vehicle every 3,000 miles or during oil changes can help catch any potential issues early on.
Is installation difficult for someone without mechanical experience?
While it's possible for novices to install a new thermometer housing, having basic mechanical skills will make the process smoother. If you're unsure, consult with a professional mechanic for assistance.
|
Related Business Listings |
Categories
Read More
Dealing with the loss of a loved one is an emotional and challenging time. At AMBLife, we understand the importance of providing compassionate and professional assistance during these moments. Our Dead Body Ambulance Services in Delhi are designed to ensure a respectful and smooth transition for the deceased. Why Choose AMBLife? Prompt Service: We operate 24/7, offering quick response times...

Introduction Are you looking to build a career in DevOps? With the growing demand for DevOps professionals, enrolling in the right DevOps training online can be a game-changer for your career. The industry is evolving rapidly, and companies need skilled DevOps engineers who can manage software development and IT operations seamlessly. At H2K Infosys, we offer comprehensive DevOps training...

Smoke odor eliminators are specialized products designed to neutralize and remove unpleasant smoke smells from various environments. These eliminators work by targeting and breaking down the odor-causing molecules, rather than merely masking them. Available in forms such as sprays, gels, candles, and electronic air purifiers, smoke odor eliminators cater to a wide range of needs, from...
Are you looking to invest in a water pump in Brisbane? Choosing the right water pump is crucial for irrigation, household use, or industrial purposes. With many options available in the market, it can be overwhelming to make the right decision. But fear not! In this blog post, we will walk you through the key factors to consider when purchasing a water pump in Brisbane. From the types...

온라인 스포츠 베팅을 즐기면서 동시에 다양한 혜택과 보상을 원하신다면, **데일리벳**을 선택해 보세요. 데일리벳은 다양한 스포츠 경기에 베팅할 수 있을 뿐만 아니라, 미니게임, 출석 체크, 포인트 시스템 등 재미있는 기능들이 가득합니다. 안전하고 신뢰할 수 있는 환경에서 베팅을 즐기고 싶다면, 데일리벳이 제격입니다. 데일리벳(DAILYBET)의 다양한 기능 **데일리벳(DAILYBET)**은 스포츠 베팅 외에도 여러 가지 기능들을 제공하여 사용자들이 보다 풍성한 경험을 할 수 있도록 돕습니다. 스코어보드 기능을 통해 실시간으로 진행 중인 경기를 추적하고, 자신이 베팅한 경기가 어떻게 진행되고 있는지 쉽게 확인할 수 있습니다. 또한, 출석 체크와 포인트 존을 통해 매일 포인트를...
