


Installing the victroneasysolar: A Step-by-Step Guide
Are you ready to harness the sun's power and revolutionize your energy needs? The victroneasysolar offers a streamlined solution for anyone looking to integrate solar power into their home or RV.
With its compact design, powerful performance, and user-friendly features, it’s no wonder that more people are turning to this all-in-one solar solution. Whether you're an experienced DIY enthusiast or a first-time installer, setting up your Victron EasySolar can be rewarding and empowering. Dive in as we guide you through each installation step, helping you confidently transform sunlight into sustainable energy!
The Benefits Of Using A Victronecomulti System
The victronecomulti System offers a seamless integration of solar energy and storage. One of its primary benefits is its convenience for users looking to harness renewable energy efficiently.
This system combines solar panels, an inverter, and a charge controller in one compact unit. This means less space is needed for installation and fewer components to manage.
Another advantage is its flexibility. Whether used in an RV, boat, or off-grid home, the Victron EasySolar easily adapts to various power needs.
Users enjoy enhanced reliability as well. The advanced technology ensures optimal performance even under challenging conditions.
Monitoring your energy consumption becomes simpler with built-in features that allow real-time tracking through smart devices.
Things To Consider Before Installing Victroneasyplus
Before diving into installing the victroneasyplus system, there are several crucial factors to keep in mind.
1. First, assess your power needs. Understanding your required energy is vital for proper component selection and sizing.
2. Next, consider local regulations and permits. Depending on your location, installing solar equipment may require specific approvals or guidelines.
3. Weather conditions also play a role. Ensure that the site chosen can withstand local weather patterns, from heavy winds to potential snow loads.
4. Additionally, consider future expansion. If you plan to add more solar panels or batteries later, factor this into your initial setup for easier upgrades.
Be mindful of safety precautions during installation. Properly handling electrical components is essential for both personal safety and the system's optimal performance.
Choosing the Right Location for Installation
Choosing the right location for your Victron EasySolar installation is crucial. Look for an area that receives ample sunlight throughout the day. This will maximize your solar panel efficiency.
Consider roof space if you're installing panels on a building. Ensure no obstructions, like trees or nearby structures, cast shadows over them. Ground-mounted systems require a clear patch of land with good sun exposure, too.
Proximity to existing electrical connections can make wiring more straightforward and more efficient. Think about accessibility as well; you’ll want to reach components for maintenance or troubleshooting in the future easily.
Check local regulations regarding solar installations. Some areas have specific guidelines about positioning and mounting systems that you'll need to follow.
Gathering the Necessary Tools and Materials
Gathering the right tools and materials before starting your Victron EasySolar installation. This will ensure a smooth process from start to finish.
Start with essential hand tools like screwdrivers, pliers, and wrenches. These will help you secure connections and components effectively. A multimeter can also come in handy for testing electrical connections.
Don’t forget about safety gear! Gloves and goggles are essential while working with electrical systems.
Next, check your list of required materials. You’ll need solar panels, batteries, an inverter, a charge controller, and wiring—Double-check specifications to ensure compatibility among all components.
Consider any mounting hardware or brackets needed to secure your solar panels. Having everything ready before starting saves time later on and helps prevent frustration during installation.
Assembling The Components Of The Victronbms
Assembling the victronbms system is a straightforward process. Start by unpacking all components carefully. Lay them out to ensure everything is present.
· Begin with the solar charge controller. It’s usually at the heart of your setup, managing energy flow efficiently. Mount it securely according to manufacturer guidelines.
· Next, integrate the inverter into your assembly. This device converts DC power from batteries into usable AC power for appliances. Position it close to your battery bank for optimal efficiency.
· Ensure adequate ventilation around both units; overheating can lead to performance issues.
· Now, connect individual parts using appropriate cables and connectors as specified in the manual. Follow polarity markings closely—this will prevent any electrical mishaps during operation.
Once assembled, double-check connections before wiring your solar panels and batteries for a seamless setup experience.
Connecting the Solar Panels and Batteries
Connecting the solar panels to the batteries is crucial in setting up your Victron EasySolar system. Start by laying out all connections carefully. Ensure that you’re connecting positive to positive and negative to negative. Use appropriate gauge wires for the distance between components. This will help minimize energy loss and maintain efficiency. It’s essential to check that your battery bank is compatible with the voltage output from your solar panels.
Before proceeding, inspect all connections for any signs of corrosion or wear. A clean connection will enhance performance and longevity. Once everything looks good, connect each panel's output terminals directly to the charge controller input. This setup channels sunlight efficiently into stored power, ready for use when needed.
Pay attention as you tighten each connection – secure but not overly tight! This meticulous approach ensures safety and optimal functionality in your vital solar system.
Wiring and Connecting to Your Electrical System
Wiring and connecting your Victron EasySolar system to your electrical setup is crucial for optimal performance. Start by ensuring that all components are powered down. Safety first!
Next, use appropriate gauge wire based on your system's load requirements. This prevents overheating and ensures efficiency. It’s essential to follow the manufacturer’s guidelines for wiring connections.
Connect the inverter output directly to your main distribution panel or a dedicated sub-panel. Use circuit breakers where necessary to safeguard against overloads.
For DC connections, ensure the polarity is correct when linking batteries and solar panels. Incorrect wiring can damage components or lead to inefficiencies.
Once everything is wired up, double-check each connection before powering the system. A meticulous approach here pays off in smoother operation down the line!
Required Tools and Materials
To install the Victron EasySolar system, you'll need a few essential tools and materials. First on the list is a reliable multimeter. This device will help you measure voltage and ensure everything functions properly. Next, gather your hand tools—screwdrivers, wrenches, and pliers are crucial for assembling components. A drill can make installation quicker when mounting panels or securing brackets.
You'll also require cabling to connect the solar panels to the charge controller and batteries. Make sure to choose cables of appropriate size based on your system's specifications. Don’t forget connectors! MC4 connectors are popular for connecting solar panels securely. Have some safety gear handy: gloves and goggles ensure you're protected during installation tasks.
Choosing the Right Location for Installation
Choosing the right location for installing your Victron EasySolar system is crucial. Solar panels' efficiency relies heavily on their exposure to sunlight. Look for a spot that receives maximum sun throughout the day.
Consider factors like shade from trees or buildings, which can obstruct sunlight and reduce energy production. Ideally, select a south-facing area if you’re in the Northern Hemisphere; this orientation captures more direct rays.
Accessibility is another important factor. Ensure you can easily reach all components for maintenance and troubleshooting. Consider how often you'll need to access batteries and wiring, too.
Additionally, keep local regulations in mind regarding installation height and distance from property lines. A well-planned location will enhance performance while making it easier to manage your system long-term.
Mounting the Solar Panels
Mounting solar panels is a crucial step in installing your Victron EasySolar system. Start by selecting a sturdy roof or ground structure to support the weight and withstand environmental factors.
Ensure you have all necessary mounting hardware before beginning. For solar panel installations, this typically includes brackets, rails, and bolts. These components will provide stability and ensure optimal performance.
Position the panels to maximize sunlight exposure throughout the day. A southern orientation works best in many regions, but local conditions may vary. Adjust angles based on seasonal sun paths if needed.
Securely fasten each panel to the mounting structure using appropriate tools, such as wrenches and drills. Double-check connections for tightness to prevent movement during windy conditions or storms.
Consider adding protective features such as weatherproof seals around holes made during installation to avoid leaks or damage over time.
Connecting the Solar Panels to the Charge Controller
Connecting the solar panels to the charge controller is crucial in setting up your Victron EasySolar system. Ensure you have all necessary components at hand. Start with the positive and negative leads from each solar panel. Keeping these connections tidy is essential, as it prevents confusion later on. Use appropriate connectors that fit snugly; loose connections can lead to inefficiencies or damage.
Once connected, ensure the voltage matches what your charge controller can handle. This compatibility ensures optimal performance and safety for your entire setup. Before finalizing everything, double-check your wiring against any instructions provided with your Victron EasySolar kit. This attention to detail will pay off in seamless operation down the line.
Finishing Touches and Final Checks
Once everything is installed, it’s time for the finishing touches. Start by double-checking all connections. Ensure that wires are secure and free from damage. Any loose connection can lead to performance issues. Next, examine the solar panels’ alignment. They should be positioned to maximize sunlight exposure throughout the day. A slight adjustment might make a significant difference in energy output.
Remember safety measures as well. Verify that circuit breakers and fuses are correctly rated for your system capacity. This step is vital for protecting your equipment and home. Power up the system slowly while monitoring your battery monitor or inverter display performance readings. Look out for any unusual sounds or indicators suggesting something isn’t right; early detection can save you headaches down the road!
Conclusion
Victroneasysolar system is designed for efficiency, providing reliable power wherever needed. By harnessing solar energy, you're reducing utility bills and minimizing your carbon footprint. The step-by-step process may seem daunting initially, but anyone can tackle this installation with proper planning and preparation. Choosing the right location and gathering the necessary tools will streamline the experience. Each component plays a crucial role in maximizing efficiency.
FAQs
What is included in the Victron EasySolar package?
The Victron EasySolar typically includes a solar charge controller, inverter, and built-in battery charger. It comes pre-wired for ease of installation, saving time and effort while ensuring optimal performance.
Can I connect multiple solar panels to my EasySolar system?
You can connect multiple solar panels to enhance your energy generation capacity. Just ensure they match the specifications outlined by Victron for compatibility and efficiency.
Is professional installation recommended for the Victron EasySolar?
While many DIY enthusiasts successfully install their systems, hiring a professional can provide peace of mind. A qualified electrician ensures compliance with local codes and optimizes system performance.
|
Related Business Listings |
Categorías
Read More
EA FC 25: How to Choose the Best Strikers in Career Mode – A Guide to the Top 7 Strikers EA Sports FC 25 has quickly become one of the most popular football simulation games, thanks to its realistic graphics, immersive gameplay, and the exciting challenge it offers to players. One of the most essential aspects of success in the EA FC 25 Coins game, particularly in Career Mode, is...
In today’s digital age, ranking higher on Google is a priority for businesses, bloggers, and content creators alike. Top Atlanta SEO Services improve visibility, drive organic traffic and increase conversions. Achieving a prime position on search engine results pages (SERPs) requires a combination of strategic planning and continuous effort. Here’s a practical guide to boost your...

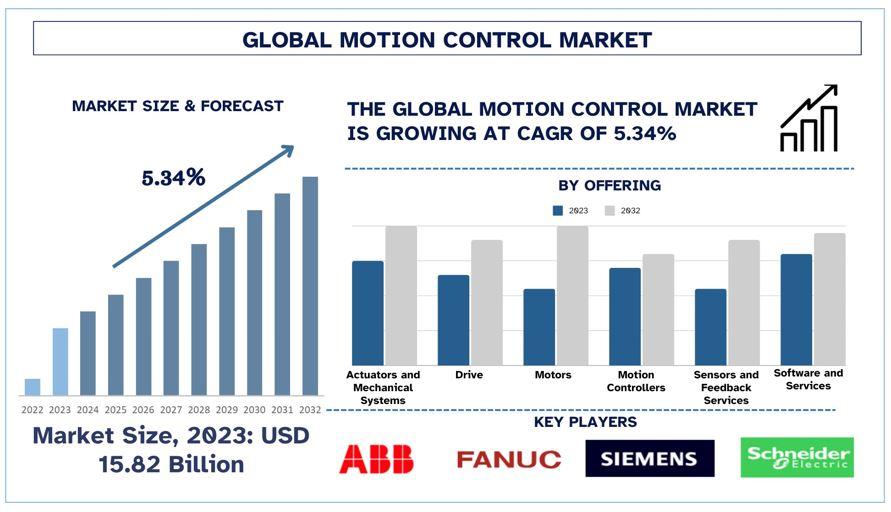
According to a new report by Univdatos Market Insights, the Motion Control Market is expected to reach USD 25.22 billion in 2032 by growing at a CAGR of 5.34%. Motion control is the mechanism where the movement of machinery is done by using rotatory and linear actuators. It is the sub-field of the automation process, whereby position or velocity machines are being...
Knox 47 Male Enhancement - In today's fast-paced world, many men face challenges related to their sexual health. Factors such as stress, age, and lifestyle choices can affect male performance and vitality. However, advancements in science and technology have led to the development of male enhancement supplements like Knox 47 Male Enhancement, offering a natural solution to...

Lysosomal Enzymes Market – Industry Trends and Forecast to 2029 Global Lysosomal Enzymes Market, By Drugs (Velaglucerase, Imiglucerase, Alglucosidase, Others), Indication (Gaucher Disease, Mucopolysaccharidosis, Pompe Disease, Others), End-Users (Hospitals, Homecare, Specialty Clinics, Others), Distribution Channel (Hospital Pharmacy, Online Pharmacy, Retail Pharmacy) –...