


Vacuum Sealers Usage: Step-by-Step Instructions Guide
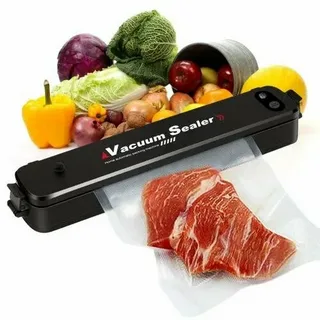
Vacuum-Sealers have revolutionised modern kitchens and households by efficiently preserving food and other items. These devices work by removing air from a specially designed bag or container, creating a vacuum that significantly prolongs the shelf life of the contents. By reducing exposure to oxygen, Vacuum Sealers help prevent spoilage, freezer burn, and bacterial growth. This makes them invaluable for storing leftovers, bulk purchases, and delicate items like important documents or electronics. Additionally, vacuum sealing can benefit outdoor enthusiasts who need waterproof gear or food supplies. The versatility and utility of Vacuum-Sealers make them a worthwhile investment for any household. This guide will provide detailed, step-by-step instructions to ensure effective and efficient use of Vacuum-Sealers, covering various types and practical applications.
Types of Vacuum-Sealers
Various types of Vacuum-Sealers are available, each catering to different needs. External Vacuum-Sealers are the most common and are suitable for home use. Chamber Vacuum-Sealers are more robust and often used commercially, offering greater vacuum strength and versatility. Handheld Vacuum-Sealers are compact and ideal for small tasks or quick jobs. When comparing features, consider factors like suction power, ease of use, and compatibility with different bag sizes and materials. Some models offer additional functionalities, such as built-in bag cutters or multiple sealing modes. Selecting the right type depends on individual requirements and the specific tasks of the vacuum sealer.
Choosing the Right Vacuum-Sealers
Selecting the ideal vacuum sealer involves evaluating your specific needs and budget. For occasional use, external Vacuum-Sealers are typically sufficient. A chamber sealer may be more appropriate for frequent or large-scale sealing due to its enhanced capabilities. Popular brands like FoodSaver and Nesco offer a range of models with varying features, such as adjustable suction power and built-in bag cutters. Handheld models are convenient for small tasks and portability. Reviewing and comparing specifications, such as ease of use and compatibility with different bag sizes, can help make an informed decision. Always consider the types of items you plan to seal and how often the sealer will be used.
Preparing Items for the right Vacuum Sealer
Proper preparation of items is crucial for effective vacuum sealing. Begin by cleaning and drying the items to be sealed, ensuring no moisture could interfere. For certain foods, like berries or meats, pre-freezing is recommended. This helps maintain the texture and shape during the vacuum sealing process.
When dealing with documents or electronics, ensure they are dust-free and in good condition. It is also advisable to cut larger items into smaller portions, making them easier to seal and store. Additionally, use vacuum-seal compatible bags or containers to avoid sealing and storage integrity issues. This step helps ensure a strong and lasting seal, preserving the quality of the contents.
Setting Up the Best Vacuum Sealer
Unbox the Best Vacuum Sealer and check all components are present. Follow the manufacturer’s instructions for assembly. Locate a stable, flat surface for the machine. Plug the sealer into an electrical outlet. Familiarise yourself with the control panel, noting settings for different food types. Ensure the sealing strip and gasket are correctly positioned.
Prepare bags or rolls as needed, cutting and sealing one end if using rolls. Place the vacuum sealer in a convenient location for regular use. Conduct a test seal to verify the machine is functioning correctly. Adjust settings as necessary for specific food types. Regularly check and clean the sealing area to maintain optimal performance.
Sealing Dry Foods OF Portable Vacuum-Sealer
To seal dry foods, ensure they are clean and dry before placing them into the vacuum bag. Avoid overfilling to provide a secure seal. Insert the open end of the bag into the vacuum sealer’s channel, ensuring the edges are correctly aligned. Close the lid and select the dry food setting. Initiate the sealing process and allow the machine to complete the vacuum and sealing cycle.
Once done, inspect the seal for any imperfections or gaps. If necessary, repeat the process to ensure a tight, airtight seal. Proper alignment and cleanliness of the bag's opening are crucial for achieving an effective seal.
Sealing Liquids and Moist Foods of Portable Vacuum-Sealer
Sealing liquids and moist foods requires care to prevent spills and ensure a secure seal. Partially freeze liquids before placing them in the vacuum bag. Select the "moist" setting on the vacuum sealer for wet foods to handle the extra humidity. Placing a paper towel just above the food inside the bag can absorb excess moisture, helping to achieve a better seal. Ensure the bag is not overfilled, and the open end is correctly aligned in the vacuum sealer's channel. Once sealed, check for leaks or incomplete seals and repeat the process if necessary. This method ensures the integrity of the vacuum seal for liquids and moist items.
Using a Portable Vacuum Sealer and Rolls
Portable Vacuum Sealer often utilise rolls, offering flexibility in bag size. Start by cutting a section of the roll to the desired length. Seal one end of the cut roll using the vacuum sealer. Fill the newly created bag with items, ensuring not to overfill.
Insert the open end into the vacuum sealer’s channel, aligning it correctly. Close the lid and initiate the sealing process. Inspect the seal for any imperfections. Rolls should be stored in a cool, dry place to maintain integrity. Adjust settings on the vacuum sealer as needed for different types of food. This method provides customised storage solutions and maximises the utility of the vacuum sealer.
Maintaining Your Portable-Vacuum Sealer
Regular maintenance is essential for optimal performance and longevity of a portable-vacuum sealer. After each use, clean the sealing area and vacuum chamber with a damp cloth to remove any food particles or residue. Inspect the sealing strip and gaskets regularly for wear and tear, replacing them as needed to ensure a tight seal.
Keep the machine dry and store it in a calm, dust-free environment. Lubricate moving parts per the manufacturer’s instructions to prevent friction and wear. Avoid using harsh chemicals or abrasive materials that could damage the components. Regularly check the power cord for any signs of damage or wear, replacing it if necessary.
Troubleshooting Common Problems with Vacuum-Sealers
Common issues with Vacuum-Sealers include incomplete seals, air leaks, and overheating. For incomplete seals, ensure the bag's edges are clean and aligned correctly in the vacuum sealer. Air leaks might be due to punctured bags or worn-out gaskets.
Overheating can occur if the machine is used continuously without breaks; allow it to cool down between uses. If the vacuum sealer does not start, check the power connection and ensure the lid is firmly closed. For persistent issues, consult the user manual or contact customer support. Regular maintenance, such as cleaning and inspecting parts, can prevent many common problems.
Creative Uses for Vacuum-Sealers
Vacuum-Sealers are helpful for more than just food preservation. Protect important documents from moisture and wear by vacuum sealing them. Preserve jewellery by preventing tarnish and oxidation. Clothing can be vacuum sealed for space-saving storage, making it perfect for travel or seasonal organisation. Vacuum-Sealers can also waterproof items such as matches, maps, and first aid supplies, which are ideal for camping or boating.
Additionally, vacuum sealing is used to marinate meats and vegetables quickly, as the vacuum process opens pores and allows for faster absorption of marinades. For hobbyists, vacuum sealing can keep craft supplies like fabrics and yarns fresh and protected from dust. This versatility makes Vacuum-Sealers valuable beyond the kitchen.
Concluison
Mastering Vacuum-Sealers can transform household storage and food preservation practices. Optimal performance can be achieved by choosing the appropriate type, preparing items correctly, and performing regular maintenance. The step-by-step guide covers various applications, from sealing dry foods to managing liquids and moist items, ensuring a comprehensive understanding of the process. Additionally, exploring creative uses outside of the kitchen broadens the utility of Vacuum-Sealers, making them indispensable tools for various tasks. Adhering to the outlined procedures can enhance efficiency, extending the lifespan of food and other valuable items.
Frequently Asked Questions
How often should Vacuum Sealers gasket be replaced?
Gaskets generally need replacement every 6 to 12 months, depending on the frequency of use. Inspect for wear and tear regularly.
Can Vacuum-Sealers be used for sous vide cooking?
Yes, vacuum-sealed bags are suitable for sous vide cooking as they can endure extended water and heat exposure periods.
Is it possible to vacuum seal liquids without pre-freezing?
While pre-freezing is advisable to avoid spills, a liquid barrier or specialised bag can seal liquids without pre-freezing.
Can Vacuum-Sealers handle delicate items?
Yes, many Vacuum-Sealers have adjustable settings to safely seal delicate items without damaging them.
What types of bags are compatible with Vacuum-Sealers?
Use vacuum-seal compatible bags designed to work with your specific vacuum sealer model for optimal results.
|
Related Business Listings |
Categorias
Leia Mais
In today’s digital landscape, search engine optimization (SEO) plays a pivotal role in helping businesses reach their audience online. A core element of any effective SEO strategy is keyword research, where marketers identify the best keywords to attract visitors. But selecting keywords is more than just guessing popular search terms—competition can vary drastically, and some...
It was a quiet afternoon on campus when I realized how much my life had changed in the past three years. Sitting on the sprawling lawns of Uttaranchal University, with the lush mountains framing the horizon, I found myself reflecting. Life here wasn’t just about academics. It was about growth, learning from mistakes, and forming bonds that would last a lifetime. But let me backtrack a...
Book Kalka to Shimla cab online at best price. CabBazar provides car rental services for all cab types AC, Non AC, Hatchback, SUV, Sedan, Innova and Tempo Traveller. Both One way taxi and round trip cab available at lowest price. Price starts Rs. 9/Km.

Finding the right chiropractor is essential for your health and overall well-being. While recommendations and reviews are helpful, the true measure of a great chiropractor lies in your personal experience. Here are six clear signs to help you identify a skilled and reliable chiropractor. 1. They Listen and Understand Your Needs A great chiropractor prioritizes listening to your concerns and...

The Cosmelan peel is a professional skin treatment designed to address hyperpigmentation and uneven skin tone. This advanced treatment offers a solution for those looking to reduce dark spots, melasma, and other forms of discoloration, leading to smoother, more radiant skin. Whether you’re new to skincare or a seasoned enthusiast, the Cosmelan peel may be the solution to elevate your...
