


Embroidery Stabilizers Explained How to Choose the Right One for Your Project
Embroidery is an art form that combines creativity and precision. But even the most beautiful designs can go wrong if you don’t have the right foundation. That’s where embroidery stabilizers come in. These unsung heroes work behind the scenes to ensure your stitches look crisp, clean, and professional. If you’ve ever wondered what stabilizers are, why they’re important, or how to choose the right one for your project, you’re in the right place. Let’s dive into Understanding Embroidery Stabilizers and make sense of it all!
What Are Embroidery Stabilizers?
Embroidery stabilizers are materials used to support fabric during the embroidery process. They act as a temporary backbone, preventing the fabric from puckering, stretching, or distorting as the needle and thread do their work. Think of them as the scaffolding that holds everything in place while you create your masterpiece.
Stabilizers come in various types, each designed for specific fabrics and projects. Using the right stabilizer can make the difference between a flawless design and a disappointing mess.
Why Are Stabilizers Important?
You might be tempted to skip the stabilizer, especially if you’re working with sturdy fabric. But here’s why you shouldn’t:
1. Prevents Puckering
Puckering happens when the fabric bunches up around the stitches, creating a wrinkled, uneven look. Stabilizers keep the fabric flat and smooth, ensuring your design stays pristine.
2. Reduces Stretch
Stretchy fabrics like knits can distort under the pressure of the embroidery machine. Stabilizers provide the necessary support to keep the fabric stable.
3. Improves Stitch Quality
A good stabilizer ensures that every stitch lands exactly where it should, resulting in clean, professional-looking embroidery.
4. Protects Delicate Fabrics
Delicate fabrics like silk or lace can easily tear or snag during embroidery. Stabilizers add a layer of protection, preventing damage.
Types of Embroidery Stabilizers
Not all stabilizers are created equal. The type you choose depends on your fabric, design, and project requirements. Here’s a breakdown of the most common types:
1. Cut-Away Stabilizers
Cut-away stabilizers are durable and long-lasting. As the name suggests, you cut away the excess stabilizer after embroidery, leaving a layer permanently attached to the fabric. These are ideal for stretchy fabrics like knits or designs that require heavy stitching.
- Best for: T-shirts, sweatshirts, and other stretchy fabrics.
- Pros: Provides strong support, prevents stretching over time.
- Cons: Leaves a permanent layer, which may feel stiff.
2. Tear-Away Stabilizers
Tear-away stabilizers are lightweight and easy to remove. After embroidery, you simply tear away the excess stabilizer, leaving no residue. These are great for stable fabrics like cotton or linen.
- Best for: Non-stretchy fabrics, lightweight designs.
- Pros: Easy to remove, leaves no residue.
- Cons: Not suitable for stretchy or delicate fabrics.
3. Wash-Away Stabilizers
Wash-away stabilizers dissolve in water, making them perfect for projects where no trace of stabilizer should remain. They’re often used for freestanding lace designs or delicate fabrics.
- Best for: Delicate fabrics, freestanding lace, heirloom projects.
- Pros: Completely disappears after washing.
- Cons: Requires water to remove, not reusable.
4. Heat-Away Stabilizers
Heat-away stabilizers vanish when exposed to heat, such as from an iron or heat gun. These are ideal for projects where water might damage the fabric or design.
- Best for: Fabrics that can’t be washed, intricate designs.
- Pros: Easy to remove with heat, no residue.
- Cons: Requires heat source, not reusable.
5. Adhesive Stabilizers
Adhesive stabilizers have a sticky backing that adheres to the fabric, holding it in place during embroidery. These are great for tricky fabrics like towels or slippery materials.
- Best for: Towels, slippery fabrics, multi-hoop designs.
- Pros: Keeps fabric secure, reduces shifting.
- Cons: Can leave residue, may be harder to remove.
How to Choose the Right Stabilizer for Your Project
Choosing the right stabilizer doesn’t have to be overwhelming. Here’s a simple guide to help you make the best choice:
1. Consider the Fabric
The type of fabric you’re using is the most important factor. Stretchy fabrics need cut-away stabilizers, while stable fabrics work well with tear-away or wash-away options.
2. Evaluate the Design
Heavy designs with dense stitching require more support, so opt for cut-away or adhesive stabilizers. Lightweight designs can use tear-away or wash-away stabilizers.
3. Think About the End Use
If the embroidered item will be washed frequently, a cut-away stabilizer is a good choice for durability. For decorative items, a tear-away or wash-away stabilizer may be more appropriate.
4. Test Before You Commit
When in doubt, test your stabilizer on a scrap piece of fabric. This will help you see how it performs and make adjustments if needed.
Tips for Using Embroidery Stabilizers
Using stabilizers effectively can take your embroidery to the next level. Here are some tips to keep in mind:
- Layer Up: For extra support, use multiple layers of stabilizer. This is especially helpful for dense designs or tricky fabrics.
- Match the Weight: Choose a stabilizer that matches the weight of your fabric. Heavy fabrics need heavier stabilizers, and vice versa.
- Hoop It Right: Make sure your fabric and stabilizer are hooped together tightly to prevent shifting during embroidery.
- Trim Excess: Trim excess stabilizer around the design area to reduce bulk and make it easier to remove later.
Common Mistakes to Avoid
Even experienced embroiderers can make mistakes when it comes to stabilizers. Here are some common pitfalls to watch out for:
- Using the Wrong Type: Using a tear-away stabilizer on stretchy fabric can lead to puckering and distortion.
- Skipping the Stabilizer: Skipping the stabilizer altogether is a recipe for disaster. Always use one, even if you think your fabric is sturdy enough.
- Overlooking Fabric Type: Not all stabilizers work well with all fabrics. Always consider the fabric type before choosing a stabilizer.
- Ignoring Design Density: Dense designs need more support. Don’t skimp on stabilizer layers for intricate or heavy designs.
Final Thoughts
Embroidery stabilizers may not be the most glamorous part of the embroidery process, but they’re absolutely essential. They provide the support and stability your fabric needs to create stunning, professional-looking designs. By understanding the different types of stabilizers and how to use them, you can take your embroidery projects to the next level.
So, the next time you’re ready to start a new project, don’t forget to give your stabilizer the attention it deserves. With the right stabilizer in place, you’ll be well on your way to creating embroidery that’s as flawless as it is beautiful. Happy stitching!
By mastering the art of choosing and using embroidery stabilizers, you’ll unlock the full potential of your embroidery projects. Whether you’re a beginner or a seasoned pro, the right stabilizer can make all the difference. So, experiment, explore, and enjoy the process of turning your creative visions into stitch-perfect reality!
Catégories
Lire la suite
Freestanding Emergency Department Market – Industry Trends and Forecast to 2029 Global Freestanding Emergency Department Market, By Type (Ophthalmology, Internal Medicine, Otolaryngology, Other), Application (Hospital, Clinic, Other), Ownership Type (Hospital Affiliated, Independent), Service (Laboratory Service, Imaging Service, Emergency Care, Other Services) – Industry...

Actinic keratosis (AK), also known as solar keratosis, is a precancerous skin condition that occurs due to prolonged sun exposure, leading to the development of rough, scaly patches on the skin. It is commonly seen in fair-skinned individuals, particularly among the elderly, and is considered a precursor to skin cancer, specifically squamous cell carcinoma. Given its potential to...

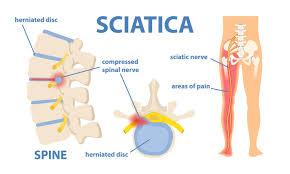
Back pain is one of the most common complaints among adults, affecting millions worldwide. It can be caused by various factors, including muscle strain, herniated discs, degenerative conditions, and nerve impingement. Sciatica is a specific type of back pain that arises from irritation or compression of the sciatic nerve. However, many struggle to distinguish sciatica from other forms of back...
Access Control Market - Size, Share, Industry Trends, Demand and Opportunities Global Access Control Market, By Technology (Authentication System, Detection Systems, Alarm Panels, Communication Devices, and Perimeter Security Systems), Component (Hardware and Software), Vertical (Commercial, Military and Defense, Government, and Others), Service (Installation and Integration, Maintenance...
Nexagen Male Enhancement - In today's fast-paced world, many men face challenges related to their sexual health. Factors such as stress, age, and lifestyle choices can affect male performance and vitality. However, advancements in science and technology have led to the development of male enhancement supplements like Nexagen Male Enhancement, offering a natural solution to...